Text Widget

“文本”小组件显示单个样式的文本字符串。字符串可能会跨越多行,也可能全部显示在同一行上,具体取决于布局约束。

1
2
3
4
5
6
7
8
9
10
11
Text(
//显示的文本
'Hello, $_name! How are you?',
//对齐的方式
textAlign: TextAlign.center,

overflow: TextOverflow.ellipsis,

//文本样式
style: TextStyle(fontWeight: FontWeight.bold),
)

下面使用Text.rich构造函数,Text小部件可以显示具有不同样式TextSpans的段落。下面的示例显示每个单词具有不同样式的“Hello beautiful world”。

1
2
3
4
5
6
7
8
9
const Text.rich(
TextSpan(
text: 'Hello', // default text style
children: <TextSpan>[
TextSpan(text: ' beautiful ', style: TextStyle(fontStyle: FontStyle.italic)),
TextSpan(text: 'world', style: TextStyle(fontWeight: FontWeight.bold)),
],
),
)

交互

要使Text对触摸事件做出反应,请使用GestureDetector.onTap处理程序将其包装在GestureDetector小部件中。

在材料设计应用程序中,请考虑使用FlatButton,或者如果不合适,至少使用InkWell而不是GestureDetector。

要使文本的各个部分具有交互性,请使用RichText并将TapGestureRecognizer指定为文本相关部分的TextSpan.recognizer。

RichText,它可以让您更好地控制文本样式。
DefaultTextStyle,用于设置Text小部件的默认样式。

构造方法

1
2
3
4
5
6
7
8
9
10
11
12
13
14
 
Text(String data, {
Key key,
TextStyle style,
StrutStyle strutStyle,
TextAlign textAlign,
TextDirection textDirection,
Locale locale,
bool softWrap,
TextOverflow overflow,
double textScaleFactor,
int maxLines,
String semanticsLabel
})
1
2
3
4
5
6
7
8
9
10
11
12
13
14
Text.rich(TextSpan textSpan, { 
Key key,
TextStyle style,
StrutStyle strutStyle,
TextAlign textAlign,
TextDirection textDirection,
Locale locale,
bool softWrap,
TextOverflow overflow,
double textScaleFactor,
int maxLines,
String semanticsLabel

})

属性

  • data → String

  • 要显示的文字

  • locale → Locale

    • 用于在可以以不同方式呈现相同Unicode字符时选择字体,具体取决于区域设置
    • 很少需要设置此属性。默认情况下,其值继承自包含Localizations.localeOf(context)的应用程序
    • 有关更多信息,请参见RenderParagraph.locale
  • maxLines→int

  • 文本要跨越的可选最大行数,必要时包装。如果文本超过给定的行数,则会根据溢出将其截断

  • overflow→TextOverflow

    • 如何处理视觉溢出
    • TextOverflow枚举
      • clip→const TextOverflow
        剪切溢出的文本以修复其容器。
        const TextOverflow(0)
      • ellipsis→const TextOverflow
        将溢出的文本淡化为透明。
        const TextOverflow(1)
      • ellipsis→const TextOverflow
        使用省略号表示文本已溢出。
        const TextOverflow(2)
      • visible→const TextOverflow
        在其容器外部渲染溢出的文本。
        const TextOverflow(3)
      • values→const List
        此枚举中值的常量列表,按其声明顺序排列。
        const List
  • semanticsLabel→String

    • 此文本的替代语义标签
    • 如果存在, 这个小部件的语义将包含此值, 而不是实际的文本。这将覆盖任何直接应用于 TextSpans 的语义标签
    • 这对于用全文值替换缩写或短文很有用: Text(r'$$', semanticsLabel: 'Double dollars')
  • softWrap→bool

    • 文本是否应该在软换行符处中断
    • 如果是false, 文本中的字形将被定位为无限的水平空间
  • strutStyle→StrutStyle

    • 要使用的strut风格。 Strut样式定义了strut,它设置了最小垂直布局度量

    • 允许省略或提供 null 将禁用strut. 为 StrutStyle 的任何属性提供 null 将导致使用默认值

    • 强烈建议至少指定一个字体. 有关详细信息, 请参见 StrutStyle

    • eg:

      1
      2
      3
      4
      5
      6
      7
      8
      9
      10
      11
      12
         const Text(
      'Hello, world!\nSecond line!',
      style: TextStyle(
      fontSize: 10,
      fontFamily: 'Raleway',
      ),
      strutStyle: StrutStyle(
      fontFamily: 'Roboto',
      fontSize: 30,
      height: 1.5,
      ),
      ),
  • style→TextStyle

    • 如果为非null,则为此文本使用的样式
    • 如果样式的 “继承” 属性为 true, 则该样式将与最接近的封闭默认文本样式合并
    • 否则, 该样式将替换最接近的封闭的默认文本样式
  • textAlign→TextAlign

    • 文本应如何水平对齐
    • TextAlign 枚举
      • left → const TextAlign 文本左对齐 const TextAlign(0)
      • right → const TextAlign 文本右对齐 const TextAlign(1)
      • center→ const TextAlign 文本中心对齐 const TextAlign(2)
      • justify → const TextAlign 拉伸以柔和的换行符结束的文本行, 以填充容器的宽度. 以硬线符结束的线条与起始边缘对齐。const TextAlign(3)
      • start → const TextAlign 文本开始处对齐 从左到右即为左边,从右到左即为右边 const TextAlign(4)
      • end → const TextAlign 文本结束处对齐 从左到右即为右边,从右到左即为左边 const TextAlign(5)
      • values → const List 此枚举中值的常量列表,按其声明顺序排列。
  • textDirection→TextDirection

    • 文本的方向性
    • 这也就解释为什么出现TextAlign.start和TextAlign.end等textAlign值
    • eg: 例如,如果数据是英语短语后跟希伯来语短语,则在TextDirection.ltr上下文中,英语短语将位于左侧,希伯来语短语位于其右侧,而在TextDirection.rtl上下文中,英语短语将 在右边,左边是希伯来语。
  • textScaleFactor→double

    • 每个逻辑像素的字体像素数
    • 例如,如果文本比例因子为1.5,则文本将比指定的字体大小大50%
    • 作为textScaleFactor赋予构造函数的值。 如果为null,将使用从环境MediaQuery获取的MediaQueryData.textScaleFactor,如果范围内没有MediaQuery,则使用1.0。
  • textSpan→TextSpan

  • 要显示为TextSpan的文本

  • hashCode→int

  • 此对象的哈希码

  • key→Key

  • 控制一个小部件如何替换树中的另一个小部件

  • runtimeType→Type

    • 表示对象的运行时类型

方法

  • build(BuildContext context)→Widget

    • 描述此窗口小部件表示的用户界面部分
  • debugFillProperties(DiagnosticPropertiesBuilder properties)→void

    • 添加与节点关联的其他属性
  • createElement()→StatelessElement

    • 创建StatelessElement以管理此窗口小部件在树中的位置。 […]
  • debugDescribeChildren()→ List

    • 返回描述此节点的子节点的DiagnosticsNode对象列表。 […]
  • noSuchMethod(Invocation invocation)→dynamic

    • 访问不存在的方法或属性时调用。 […]
  • toDiagnosticsNode({String name,DiagnosticsTreeStyle style})→DiagnosticsNode

    • 返回调试工具和DiagnosticsNode.toStringDeep使用的对象的调试表示形式。 […]
  • toString({DiagnosticLevel minLevel:DiagnosticLevel.debug})→字符串

    • 返回此对象的字符串表示形式
  • toStringDeep({String prefixLineOne:’’,String prefixOtherLines,DiagnosticLevel minLevel:DiagnosticLevel.debug})→String

    • 返回此节点及其后代的字符串表示形式。 […]
  • toStringShallow({String joiner:’,’,DiagnosticLevel minLevel:DiagnosticLevel.debug})→String

    • 返回对象的单行详细描述。 […]
  • toStringShort()→String

    • 这个小部件的简短文字描述

Operators运算符

  • operator ==(dynamic other) → bool
    • 等值运算符。 […]

Scaffold

实现基本材料设计视觉布局结构

构造函数(Constructors)

1
2
3
4
5
6
7
8
9
10
11
12
13
14
15
16
17
18
Scaffold({
Key key,
PreferredSizeWidget appBar,
Widget body,
Widget floatingActionButton,
FloatingActionButtonLocation floatingActionButtonLocation, FloatingActionButtonAnimator floatingActionButtonAnimator,
List<Widget> persistentFooterButtons,
Widget drawer,
Widget endDrawer,
Widget bottomNavigationBar,
Widget bottomSheet,
Color backgroundColor,
bool resizeToAvoidBottomPadding,
bool resizeToAvoidBottomInset,
bool primary: true,
DragStartBehavior drawerDragStartBehavior: DragStartBehavior.start,
bool extendBody: false
})

属性(Properties)

  • appBar → PreferredSizeWidget

顶部导航栏

  • backgroundColor → Color

背景色

  • body → Widget

Scaffold的主要内容

  • bottomNavigationBar → Widget

底部导航栏

  • bottomSheet → Widget

The persistent bottom sheet to display. […]

  • drawer → Widget

显示在容器侧面的面板,通常隐藏在移动设备上。从左到右(TextDirection.ltr)或从右到左(TextDirection.rtl)滑入

  • drawerDragStartBehavior → DragStartBehavior

确定处理拖动开始行为的方式

  • endDrawer → Widget

显示在身体侧面的面板,通常隐藏在移动设备上。从右到左(TextDirection.ltr)或从左到右(TextDirection.rtl)滑动

  • extendBody → bool

如果为true,并且指定了bottomNavigationBar或persistentFooterButtons,则body将延伸到Scaffold的底部,而不是仅延伸到bottomNavigationBar或persistentFooterButtons的顶部

  • floatingActionButton → Widget

显示在容器上方的按钮,位于右下角

  • floatingActionButtonAnimator → FloatingActionButtonAnimator

Animator将floatingActionButton移动到新的floatingActionButtonLocation

  • floatingActionButtonLocation → FloatingActionButtonLocation

负责确定floatingActionButton的去向

  • persistentFooterButtons → List

一组显示在脚手架底部的按钮

  • primary → bool

此脚手架是否显示在屏幕顶部

  • resizeToAvoidBottomInset → bool

如果为true,则body和scaffold的浮动小部件应自行调整大小,以避免屏幕键盘的高度由环境MediaQuery的MediaQueryData.viewInsets底部属性定义

  • resizeToAvoidBottomPadding → bool

    不推荐使用此标志,请改用resizeToAvoidBottomInset,
    @Deprecated(’使用resizeToAvoidBottomInset指定键盘出现时是否应调整主体大小’)

Row

一个在水平数组中显示它的子级的小部件

要使子级扩展以填充可用的水平空间, 请将子级包裹在一个展开的小部件中。

想使用竖直布局的,请前往-> Column

如果你只有一个子级, 那就考虑用 “对齐” 或 “中心” 来定位子级。

本示例将可用空间划分为三个 (水平), 并将文本置于前两个单元格中的中心, 并将 Flutter 图标置于第三个单元格的中心:

1
2
3
4
5
6
7
8
9
10
11
12
13
14
15
16
Row(
children: <Widget>[
Expanded(
child: Text('Deliver features faster', textAlign: TextAlign.center),
),
Expanded(
child: Text('Craft beautiful UIs', textAlign: TextAlign.center),
),
Expanded(
child: FittedBox(
fit: BoxFit.contain, // otherwise the logo will be tiny
child: const FlutterLogo(),
),
),
],
)

效果图:

Row

RaisedButton

一个凸起的按钮

如果onPressed(即为按钮点击事件)回调为null,则该按钮将被禁用,默认情况下将类似于disabledColor中的平面按钮。如果您尝试更改按钮的颜色并且没有任何效果,请检查您是否正在传递非null onPressed处理程序。

如果您想为点击提供墨水飞溅效果,但不想使用按钮,请考虑直接使用inkwell

凸起按钮的最小尺寸为88.0×36.0,可以用ButtonTheme覆盖。

此示例演示如何呈现禁用的RaisedButton,启用的RaisedButton以及最后一个具有渐变背景的RaisedButton:

Img

源码:

1
2
3
4
5
6
7
8
9
10
11
12
13
14
15
16
17
18
19
20
21
22
23
24
25
26
27
28
29
30
31
32
33
34
35
36
37
38
39
40
41
42
43
44
45
46
Widget build(BuildContext context) {
return Center(
child: Column(
mainAxisSize: MainAxisSize.min,
children: <Widget>[
const RaisedButton(
onPressed: null,
child: Text(
'Disabled Button',
style: TextStyle(fontSize: 20)
),
),
const SizedBox(height: 30),
RaisedButton(
onPressed: () {},
child: const Text(
'Enabled Button',
style: TextStyle(fontSize: 20)
),
),
const SizedBox(height: 30),
RaisedButton(
onPressed: () {},
textColor: Colors.white,
padding: const EdgeInsets.all(0.0),
child: Container(
decoration: const BoxDecoration(
gradient: LinearGradient(
colors: <Color>[
Color(0xFF0D47A1),
Color(0xFF1976D2),
Color(0xFF42A5F5),
],
),
),
padding: const EdgeInsets.all(10.0),
child: const Text(
'Gradient Button',
style: TextStyle(fontSize: 20)
),
),
),
],
),
);
}

构造函数(Constructors)

创建一个填充按钮

1
2
3
4
5
6
7
8
9
10
11
12
13
14
15
16
17
18
19
20
RaisedButton({
Key key,
@required VoidCallback onPressed,
ValueChanged<bool> onHighlightChanged,
ButtonTextTheme textTheme,
Color textColor,
Color disabledTextColor,
Color color,
Color disabledColor,
Color highlightColor,
Color splashColor,
Brightness colorBrightness,
double elevation,
double highlightElevation,
double disabledElevation,
EdgeInsetsGeometry padding,
ShapeBorder shape,
Clip clipBehavior: Clip.none, MaterialTapTargetSize materialTapTargetSize, Duration animationDuration,
Widget child
})

从一对小部件创建一个填充按钮,用作按钮的图标和标签

1
2
3
4
5
6
7
8
9
10
11
12
13
14
15
16
17
18
19
20
21
22
RaisedButton.icon({
Key key,
@required VoidCallback onPressed,
ValueChanged<bool> onHighlightChanged,
ButtonTextTheme textTheme,
Color textColor,
Color disabledTextColor,
Color color,
Color disabledColor,
Color highlightColor,
Color splashColor,
Brightness colorBrightness,
double elevation,
double highlightElevation,
double disabledElevation,
ShapeBorder shape,
Clip clipBehavior,
MaterialTapTargetSize materialTapTargetSize,
Duration animationDuration,
@required Widget icon,
@required Widget label
})

属性(Properties)

  • animationDuration → Duration

动画的持续时间

  • child → Widget

按钮的标签部件

  • clipBehavior → Clip

根据此选项,内容将被剪裁(或不剪辑)

  • color → Color

按钮的填充颜色,由其材料显示,同时处于默认(未按下,已启用)状态

  • colorBrightness → Brightness

用于设置按钮的主题亮度

  • disabledColor → Color

禁用按钮时按钮的填充颜色

  • disabledElevation → double

按钮相对于其父级的高度

  • disabledTextColor → Color

禁用按钮时用于此按钮文本的颜色

  • elevation → double

放置此按钮相对于其父按钮的Z坐标

  • enabled → bool

设置启用还是禁用按钮

  • hashCode → int

此对象的哈希码(只读)

  • height → double

按钮的垂直范围(即高度)

  • highlightColor → Color

按钮的InkWell的高亮颜色

  • highlightElevation → double

启用并按下按钮时按钮相对于其父级的高度

  • key → Key

控制一个小部件如何替换树中的另一个小部件

  • materialTapTargetSize → MaterialTapTargetSize

配置点击目标的最小尺寸

  • minWidth → double

按钮占据的最小水平范围(最小宽度)

  • onHighlightChanged → ValueChanged<bool>

由底层InkWell小部件的InkWell.onHighlightChanged回调调用

  • onPressed → VoidCallback

点击或以其他方式激活按钮时调用的回调

  • padding → EdgeInsetsGeometry

buttons子级的内部填充

  • runtimeType → Type

表示对象的运行时类型(只读)

  • shape → ShapeBorder

按钮的阴影效果设置

  • splashColor → Color

按钮墨水的泼溅颜色

  • textColor → Color

按钮的文本颜色

  • textTheme → ButtonTextTheme

    定义按钮的基色,以及按钮的最小尺寸,内部填充和形状的默认值

Image Widget

显示图像的小部件,支持以下图像格式: JPEG、PNG、GIF、动画 GIF、WebP、动画 WebP、BMP 和 WBMP

为图像可以指定的各种方式提供了几个构造函数:

  • new Image, 通过 ImageProvider获取图像
  • new Image.asset, 使用key值从资源包获取图像
  • new Image.network, 通过URL网络请求获取图像
  • new Image.file, 从文件中获取图像.
  • new Image.memory, 从 Uint8List中 获取图像.

构造方法(Constructors)

Image 创建一个显示图像的小部件

1
2
3
4
5
6
7
8
9
10
11
12
13
14
15
Image({
Key key,
@required ImageProvider image,
String semanticLabel,
bool excludeFromSemantics: false,
double width, double height,
Color color,
BlendMode colorBlendMode,
BoxFit fit,
AlignmentGeometry alignment: Alignment.center, ImageRepeat repeat: ImageRepeat.noRepeat,
Rect centerSlice,
bool matchTextDirection: false,
bool gaplessPlayback: false,
FilterQuality filterQuality: FilterQuality.low
})

创建一个小部件,显示从资源包里获得的 ImageStream,图像的键是由名称参数给出的

1
2
3
4
5
6
7
8
9
10
11
12
13
14
15
16
17
18
19
Image.asset(String name, { 
Key key,
AssetBundle bundle,
String semanticLabel,
bool excludeFromSemantics: false,
double scale,
double width,
double height,
Color color,
BlendMode colorBlendMode,
BoxFit fit,
AlignmentGeometry alignment: Alignment.center, ImageRepeat repeat: ImageRepeat.noRepeat,
Rect centerSlice,
bool matchTextDirection: false,
bool gaplessPlayback: false,
String package,
FilterQuality filterQuality: FilterQuality.low

})

创建一个小部件, 显示从文件中获得的 ImageStream

1
2
3
4
5
6
7
8
9
10
11
12
13
14
15
16
Image.file(File file, { 
Key key,
double scale: 1.0,
String semanticLabel,
bool excludeFromSemantics: false,
double width,
double height,
Color color,
BlendMode colorBlendMode,
BoxFit fit,
AlignmentGeometry alignment: Alignment.center, ImageRepeat repeat: ImageRepeat.noRepeat,
Rect centerSlice,
bool matchTextDirection: false,
bool gaplessPlayback: false,
FilterQuality filterQuality: FilterQuality.low
})

创建一个小部件,显示从Uint8List中获得的ImageStream

1
2
3
4
5
6
7
8
9
10
11
12
13
14
15
16
Image.memory(Uint8List bytes, { 
Key key,
double scale: 1.0,
String semanticLabel,
bool excludeFromSemantics: false,
double width,
double height,
Color color,
BlendMode colorBlendMode,
BoxFit fit,
AlignmentGeometry alignment: Alignment.center, ImageRepeat repeat: ImageRepeat.noRepeat,
Rect centerSlice,
bool matchTextDirection: false,
bool gaplessPlayback: false,
FilterQuality filterQuality: FilterQuality.low
})

创建一个小部件, 显示从网络获得的ImageStream

1
2
3
4
5
6
7
8
9
10
11
12
13
14
15
16
17
Image.network(String src, { 
Key key,
double scale: 1.0,
String semanticLabel,
bool excludeFromSemantics: false,
double width,
double height,
Color color,
BlendMode colorBlendMode,
BoxFit fit,
AlignmentGeometry alignment: Alignment.center, ImageRepeat repeat: ImageRepeat.noRepeat,
Rect centerSlice,
bool matchTextDirection: false,
bool gaplessPlayback: false,
FilterQuality filterQuality: FilterQuality.low,
Map<String, String> headers
})

属性(Properties)

  • alignment → AlignmentGeometry

    • 设置图像的对齐方式
  • centerSlice → Rect

    • 九片图像的中心切片
    • 中心切片内的图像区域将水平和垂直拉伸,以使图像适合其目标
    • 中心切片上方和下方的图像区域将仅水平拉伸,中心切片左侧和右侧的图像区域将仅垂直拉伸
  • color → Color

    • 如果非 null, 则使用颜色混合模式将此颜色与每个图像像素混合
  • colorBlendMode → BlendMode

    • 用于将颜色与此图像相结合
  • excludeFromSemantics → bool

    • 是否从语义中排除此图像
  • filterQuality → FilterQuality

    • 用于设置图像的FilterQuality
  • fit → BoxFit

    • 图片填充的方式
      • contain 在目标框中尽可能大的显示完整图像
        box_fit
      • cover 在目标框中尽可能小的覆盖整个目标框
        box_fit
      • fill 通过拉伸纵横比来填充整个目标框

        box_fit
      • fitHeight 在目标框中高度填充满,不论宽度是否溢出
        box_fit
      • fitWidth 在目标框中宽度填充满,不论高度是否溢出
        box_fit
      • none 对齐目标框内的源(默认情况下,居中)并丢弃位于框外的源的任何部分。源图像未调整大小。
        box_fit
      • scaleDown 对齐目标框中的源 (默认情况下, 居中), 并在必要时缩小源的比例, 以确保源适合框中。

        box_fit
  • gaplessPlayback → bool

    • 当图像更换时是继续显示旧图像 (true), 还是短暂不显示任何内容 (false)
  • height → double

    • 如果非空, 则要求图像具有此高度
  • image → ImageProvider

    • 要显示的图像
  • matchTextDirection → bool

    • 是否将图像绘制到文本方向的方向
  • repeat → ImageRepeat

    • 如何绘制图像不包括的布局边界的任何部分
      • noRepeat 让盒子的未覆盖部分保持透明,不重复
      • repeat 在 x 和 y 方向上重复图像, 直到框被填满
      • repeatX 按 x 方向重复图像, 直到水平方向填充满
      • repeatY 按 Y 方向重复图像, 直到垂直方向填充满
  • semanticLabel → String

    • 对图像的语义描述
  • width → double

    • 如果非空, 则要求图像具有此宽度
  • hashCode → int

    • 此对象的哈希代码
  • key → Key

    • 控制一个小部件如何替换树中的另一个小部件
  • runtimeType → Type

    • 对象的运行时类型

方法(Methods)

在树中的给定位置为这个小部件创建可变状态。

  • createState() → _ImageState

添加与节点管理相关联的其他属性

  • debugFillProperties(DiagnosticPropertiesBuilder properties) → void

创建StatelessElement以管理此窗口小部件在树中的位置

  • createElement() → StatelessElement

返回描述此节点的子节点的DiagnosticsNode对象列表。

  • debugDescribeChildren() → List

访问不存在的方法或属性时调用

  • noSuchMethod(Invocation invocation) → dynamic

返回调试工具和DiagnosticsNode.toStringDeep使用的对象的调试表示形式

  • toDiagnosticsNode({String name, DiagnosticsTreeStyle style }) → DiagnosticsNode

返回此对象的字符串表示形式

  • toString({DiagnosticLevel minLevel: DiagnosticLevel.debug }) → String

返回此节点及其后代的字符串表示形式

  • toStringDeep({String prefixLineOne: ‘’, String prefixOtherLines, DiagnosticLevel minLevel: DiagnosticLevel.debug }) → String

返回对象的单行详细描述

  • toStringShallow({String joiner: ‘, ‘, DiagnosticLevel minLevel: DiagnosticLevel.debug }) → String

这个小部件的简短文字描述

  • toStringShort() → String

Container Widget

一个方便的小部件, 结合了普通的绘画、定位和大小的小部件。

容器首先用填充物(由装饰中存在的任何边界膨胀)包围子对象,然后对填充范围应用附加约束(如果其中一个为非空,则将宽度和高度合并为约束)。然后容器被从边缘描述的额外的空白空间包围。

在绘画过程中,容器首先应用给定的变换,然后绘制装饰填充填充范围,然后绘制子对象,最后绘制前场装饰,也填充填充填充范围。

没有子对象的容器尽量大,除非传入的约束是无限的,在这种情况下,它们尽量小。有子对象的容器会根据子对象的大小来调整大小。构造函数的width、height和constraints参数重写了这一点。

布局行为介绍(Layout behavior)

有关框布局模型的介绍,请参阅BoxConstraints

由于Container结合了许多其他小部件,每个小部件都有自己的布局行为,因此Container的布局行为有点复杂。

摘要:容器尝试按顺序:遵循对齐,将自身大小调整为子对象,以符合宽度,高度和约束,以扩展以适合父对象,尽可能小。

进一步来说:

如果窗口小部件没有子节点,没有高度,没有宽度,没有约束,并且父节点提供无限制约束,则Container尝试尽可能小。

如果窗口小部件没有子节点且没有对齐,但提供了高度,宽度或约束,则在给定这些约束和父节点约束的组合的情况下,Container会尽可能小。

如果窗口小部件没有子节点,没有高度,没有宽度,没有约束,没有对齐,但是父节点提供了有界约束,那么Container会扩展以适应父节点提供的约束。

如果窗口小部件具有对齐,并且父窗口提供无限制约束,则Container会尝试围绕子窗口调整自身大小。

如果窗口小部件具有对齐,并且父窗口提供有界约束,则Container会尝试展开以适合父窗口,然后根据对齐方式将子项置于其自身内部。

否则,窗口小部件具有子级但没有高度,没有宽度,没有约束,也没有对齐,并且Container将约束从父级传递给子级并调整其大小以匹配子级。

边距和填充属性也会影响布局,如这些属性的文档中所述。 (它们的效果仅仅增加了上述规则。)装饰可以隐含地增加填充(例如,BoxDecoration中的边界有助于填充);请参阅Decoration.padding

此示例显示一个48x48琥珀色方块(放置在中心小部件内,以防父小部件对容器应采用的大小有自己的意见),并留有一个空白,使其远离相邻小部件:
Container

1
2
3
4
5
6
7
8
Center(
child: Container(
margin: const EdgeInsets.all(10.0),
color: Colors.amber[600],
width: 48.0,
height: 48.0,
),
)

这个例子展示了如何同时使用容器的许多特性。这些约束被设置为适合字体大小加上足够的垂直净空,同时水平展开以适合父级。填充用于确保内容和文本之间有空间。这个颜色使盒子变成蓝色。对齐会使子项在框中居中。最后,变换对整个装置应用轻微的旋转以完成效果:

屏幕快照 2019-05-25 下午6.39.27.png

1
2
3
4
5
6
7
8
9
10
11
12
13
14
Container(
constraints: BoxConstraints.expand(
height: Theme.of(context).textTheme.display1.fontSize * 1.1 + 200.0,
),
padding: const EdgeInsets.all(8.0),
color: Colors.blue[600],
alignment: Alignment.center,
child: Text('Hello World',
style: Theme.of(context)
.textTheme
.display1
.copyWith(color: Colors.white)),
transform: Matrix4.rotationZ(0.1),
)

也可以看看:

AnimatedContainer,一种在变化时平滑动画属性的变体。
边框,其中包含大量使用Container的示例。
墨水,在材质上绘制装饰,允许InkResponse和InkWell喷溅在它们上面绘画。
布局小部件的目录。

构造方法(Constructors)

创建一个小部件, 结合了普通的绘画、定位和大小调整小部件。

1
2
3
4
5
6
7
8
9
10
11
12
Container({Key key, 
AlignmentGeometry alignment,
EdgeInsetsGeometry padding,
Color color,
Decoration decoration,
Decoration foregroundDecoration,
double width,
double height,
BoxConstraints constraints, EdgeInsetsGeometry margin,
Matrix4 transform,
Widget child
})

属性(Properties)

  • alignment → AlignmentGeometry

  • 对齐内部的子级

  • child → Widget

  • 容器内部的子级

  • constraints → BoxConstraints

  • 要应用于子级的附加约束

  • decoration → Decoration

    • 子级背后的装饰
    • 可以设置边框、背景色、背景图片、圆角等属性
    • 需要注意的是 deorationcolor 背景颜色不能共存,二者同时只能有一个
      1
      2
      3
      4
      5
      6
      7
      8
      9
      decoration: new BoxDecoration(
      border: new Border.all(width: 2.0, color: Colors.red),
      color: Colors.grey,
      borderRadius: new BorderRadius.all(new Radius.circular(20.0)),
      image: new DecorationImage(
      image: new NetworkImage('http://b-ssl.duitang.com/uploads/item/201609/26/20160926203611_HXQxk.jpeg'),
      centerSlice: new Rect.fromLTRB(270.0, 180.0, 1360.0, 730.0),
      ),
      ),
    • nodecoration)nodecoration
    • 第一张图设置了背景色,未使用decoration;第二张图设置了decoration,未设置背景色
  • foregroundDecoration → Decoration

    • 在子级前面的装饰
    • 可以设置边框、背景色、背景图片、圆角等属性
    • foregroundDecorationcolor 背景颜色可以共存,但是color有可能被遮挡
    • 会遮挡child
    • nodecoration
  • margin → EdgeInsetsGeometry

  • 我的理解就是外边距

  • padding → EdgeInsetsGeometry

  • 我的理解就是内边距

  • transform → Matrix4

    • 在绘制容器之前要应用的转换矩阵
  • hashCode → int

  • 此对象的哈希代码

  • key → Key

    • 控制一个小部件如何替换树中的另一个小部件
  • runtimeType → Type

    • 对象的运行时类型

方法(Methods)

  • build(BuildContext context) → Widget

    描述此窗口小部件表示的用户界面部分

  • debugFillProperties(DiagnosticPropertiesBuilder properties) → void

    添加与节点关联的其他属性

  • createElement() → StatelessElement

    创建StatelessElement以管理此窗口小部件在树中的位置

  • debugDescribeChildren() → List

    返回描述此节点的子节点的DiagnosticsNode对象列表。

  • noSuchMethod(Invocation invocation) → dynamic

    访问不存在的方法或属性时调用

  • toDiagnosticsNode({String name, DiagnosticsTreeStyle style }) → DiagnosticsNode

    返回调试工具和DiagnosticsNode.toStringDeep使用的对象的调试表示形式

  • toString({DiagnosticLevel minLevel: DiagnosticLevel.debug }) → String

    返回此对象的字符串表示形式

  • toStringDeep({String prefixLineOne: ‘’, String prefixOtherLines, DiagnosticLevel minLevel: DiagnosticLevel.debug }) → String

    返回此节点及其后代的字符串表示形式

  • toStringShallow({String joiner: ‘, ‘, DiagnosticLevel minLevel: DiagnosticLevel.debug }) → String

    返回对象的单行详细描述

  • toStringShort() → String

    这个小部件的简短文字描述

BottomNavigationBar

显示在应用程序的底部,用于在少量视图中进行选择,通常在三到五之间。

底部导航栏通常与Scaffold结合使用,它作为Scaffold.bottomNavigationBar参数提供。

底部导航栏的类型更改其项目的显示方式。如果未指定,则当少于四个项时它会自动设置为BottomNavigationBarType.fixed,否则为BottomNavigationBarType.shifting

BottomNavigationBarType.fixed,当少于四个项目时的默认值。如果选中的项目为非null,则使用selectedItemColor渲染所选项目,否则使用主题的ThemeData.primaryColor。如果backgroundColornull,则导航栏的背景颜色默认为Material背景颜色ThemeData.canvasColor(基本上是不透明的白色)。

BottomNavigationBarType.shifting,当有四个或更多项时的默认值。如果selectedItemColornull,则所有项目都以白色呈现。导航栏的背景颜色与所选项目的BottomNavigationBarItem.backgroundColor相同。在这种情况下,假设每个项目将具有不同的背景颜色,并且背景颜色将与白色形成鲜明对比。

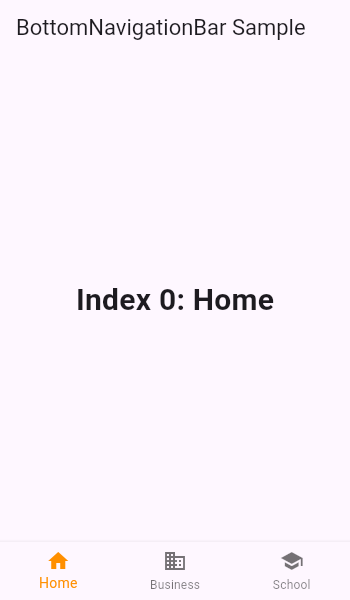
此示例显示BottomNavigationBar,因为它在Scaffold小部件中使用。 BottomNavigationBar有三个BottomNavigationBarItem小部件,currentIndex设置为索引0.所选项目为琥珀色。 _onItemTapped函数更改所选项的索引,并在Scaffold的中心显示相应的消息:

IMG

源码:

1
2
3
4
5
6
7
8
9
10
11
12
13
14
15
16
17
18
19
20
21
22
23
24
25
26
27
28
29
30
31
32
33
34
35
36
37
38
39
40
41
42
43
44
45
46
47
48
49
50
51
52
53
int _selectedIndex = 0;
static const TextStyle optionStyle = TextStyle(fontSize: 30, fontWeight: FontWeight.bold);
static const List<Widget> _widgetOptions = <Widget>[
Text(
'Index 0: Home',
style: optionStyle,
),
Text(
'Index 1: Business',
style: optionStyle,
),
Text(
'Index 2: School',
style: optionStyle,
),
];

void _onItemTapped(int index) {
setState(() {
_selectedIndex = index;
});
}

@override
Widget build(BuildContext context) {
return Scaffold(
appBar: AppBar(
title: const Text('BottomNavigationBar Sample'),
),
body: Center(
child: _widgetOptions.elementAt(_selectedIndex),
),
bottomNavigationBar: BottomNavigationBar(
items: const <BottomNavigationBarItem>[
BottomNavigationBarItem(
icon: Icon(Icons.home),
title: Text('Home'),
),
BottomNavigationBarItem(
icon: Icon(Icons.business),
title: Text('Business'),
),
BottomNavigationBarItem(
icon: Icon(Icons.school),
title: Text('School'),
),
],
currentIndex: _selectedIndex,
selectedItemColor: Colors.amber[800],
onTap: _onItemTapped,
),
);
}

构造方法(Constructors)

创建一个底部导航栏,通常用作Scaffold的Scaffold.bottomNavigationBar参数。

1
2
3
4
5
6
7
8
9
10
11
12
13
14
15
16
17
BottomNavigationBar({
Key key,
@required List<BottomNavigationBarItem> items,
ValueChanged<int> onTap,
int currentIndex: 0,
double elevation: 8.0,
BottomNavigationBarType type,
Color fixedColor,
Color backgroundColor,
double iconSize: 24.0,
Color selectedItemColor,
Color unselectedItemColor,
double selectedFontSize: 14.0,
double unselectedFontSize: 12.0,
bool showSelectedLabels: true,
bool showUnselectedLabels
})

属性(Properties)

  • backgroundColor → Color

背景颜色

  • currentIndex → int

当前活动BottomNavigationBarItem的项目索引(一般就是当前选中的那个项目索引)

  • elevation → double

此底部导航栏的Z坐标

  • fixedColor → Color

选中项目颜色的值(只读)

  • iconSize → double

所有BottomNavigationBarItem图标的大小

  • items → List<BottomNavigationBarItem>

定义在底部导航栏中排列的按钮项的外观

  • onTap → ValueChanged<int>

点击其中一个项目时响应事件

  • selectedFontSize → double

选中时BottomNavigationBarItem标签的字体大小

  • selectedItemColor → Color

选中时BottomNavigationBarItem.iconBottomNavigationBarItem.label的颜色

  • showSelectedLabels → bool

是否为未选择的BottomNavigationBarItems显示标签

  • showUnselectedLabels → bool

是否为选定的BottomNavigationBarItem显示标签

  • type → BottomNavigationBarType

定义BottomNavigationBar的布局和行为

  • unselectedFontSize → double

未选中BottomNavigationBarItem标签的字体大小

  • unselectedItemColor → Color

未选中的BottomNavigationBarItem.iconBottomNavigationBarItem.labels的颜色

  • hashCode → int

对象的哈希值(只读)

  • key → Key

控制一个小部件如何替换树中的另一个小部件

  • runtimeType → Type

    表示对象的运行时类型(只读)

AppBar

应用栏通常用于Scaffold.appBar属性,该属性将应用栏放置在屏幕顶部的固定高度小部件中。对于可滚动的应用栏,请参阅SliverAppBar,它将一个AppBar嵌入到一个条子中,以便在CustomScrollView中使用。

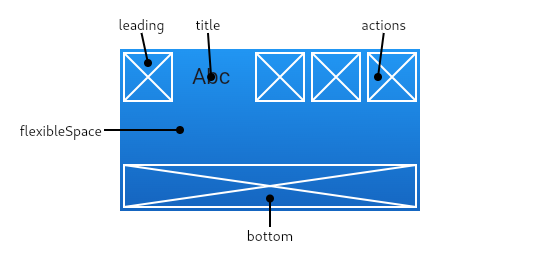
AppBar在底部(如果有)上方显示工具栏小部件,前导,标题和操作。底部通常用于TabBar。如果指定了flexibleSpace窗口小部件,则它将堆叠在工具栏和底部窗口小部件后面。下图显示了当编写语言从左到右(例如英语)时,每个插槽在工具栏中的显示位置:
image

如果省略了前导小部件,但AppBar位于带有抽屉的脚手架中,则会插入一个按钮以打开抽屉。否则,如果最近的导航器具有任何先前的路径,则会插入BackButton。可以通过将automatedImplyLeading设置为false来关闭此行为。在这种情况下,空的前导小部件将导致中间/标题小部件拉伸开始。

构造方法(Constructors)

1
2
3
4
5
6
7
8
9
10
11
12
13
14
15
16
17
18
19
20
AppBar({
Key key,
Widget leading,
bool automaticallyImplyLeading: true,
Widget title,
List<Widget> actions,
Widget flexibleSpace,
PreferredSizeWidget bottom,
double elevation,
ShapeBorder shape,
Color backgroundColor,
Brightness brightness,
IconThemeData iconTheme,
IconThemeData actionsIconTheme,
TextTheme textTheme,
bool primary: true,
bool centerTitle, double titleSpacing: NavigationToolbar.kMiddleSpacing,
double toolbarOpacity: 1.0,
double bottomOpacity: 1.0
})

eg:

1
2
3
4
5
6
7
8
9
10
11
12
13
14
15
16
17
18
19
20
AppBar(
title: Text('My Fancy Dress'),
actions: <Widget>[
IconButton(
icon: Icon(Icons.playlist_play),
tooltip: 'Air it',
onPressed: _airDress,
),
IconButton(
icon: Icon(Icons.playlist_add),
tooltip: 'Restitch it',
onPressed: _restitchDress,
),
IconButton(
icon: Icon(Icons.playlist_add_check),
tooltip: 'Repair it',
onPressed: _repairDress,
),
],
)

属性(Properties)

  • actions → List

要在标题小部件后显示的小部件

  • actionsIconTheme → IconThemeData

用于应用栏操作中显示的图标的颜色,不透明度和大小。仅当操作的主题不同于应用栏的主要小部件中显示的图标时,才应使用此选项

  • automaticallyImplyLeading → bool

Controls whether we should try to imply the leading widget if null. […]

  • backgroundColor → Color

用于应用栏材质的颜色。通常这应该与亮度,iconTheme,textTheme一起设置。

  • bottom → PreferredSizeWidget

此小组件显示在应用栏的底部

  • bottomOpacity → double

应用栏底部的不透明程度(0.0 - 1.0)

  • brightness → Brightness

应用栏材质的亮度。通常,这与backgroundColor,iconTheme,textTheme一起设置

  • centerTitle → bool

标题是否居中

  • elevation → double

放置此应用程序栏相对于其父应用程序栏的Z坐标

  • flexibleSpace → Widget

此小组件堆叠在工具栏和选项卡栏后面。它的高度与应用栏的整体高度相同

  • iconTheme → IconThemeData

用于应用栏图标的颜色,不透明度和大小。通常,这与backgroundColor,brightness,textTheme一起设置

  • leading → Widget

要在标题之前显示的小部件

  • preferredSize → Size

高度为kToolbarHeight和底部窗口小部件首选高度之和的大小

  • primary → bool

此应用栏是否显示在屏幕顶部

  • shape → ShapeBorder

形状和阴影

  • textTheme → TextTheme

应用栏中用于文本的排版样式。通常,这与亮度backgroundColor,iconTheme一起设置

  • title → Widget

appbar中显示的主要小部件

  • titleSpacing → double

横轴上标题内容周围的间距。即使没有前导内容或操作,也会应用此间距。如果希望title占用所有可用空间,请将此值设置为0.0

  • toolbarOpacity → double

    应用栏的工具栏部分透明度(0.0-1.0)

基础 Widgets

  1. Container

    一个拥有绘制、定位、调整大小的 widget。

  2. Row

    在水平方向上排列子widget的列表。

  3. Column

    在垂直方向上排列子widget的列表。

  4. Image

    一个显示图片的widget。

  5. Text

    单一格式的文本。

  6. Icon

    图标。

  7. RaisedButton

    Material Design中的button,一个凸起的材质矩形按钮

  8. Scaffold

    Material Design布局结构的基本实现。此类提供了用于显示drawer、snackbar和底部sheet的API。

  9. AppBar

    一个Material Design应用程序栏,由工具栏和其他可能的widget(如TabBar和FlexibleSpaceBar)组成。

  10. FlutterLogo

    Flutter logo,以widget形式,这个widget遵从IconTheme。

  11. Placeholder

    一个绘制了一个盒子的的widget,代表日后有widget将会被添加到该盒子中

flutter go 项目下载后,运行报如下错误:

1
2
3
4
5
6
7
8
9
10
11
12
13
14
15
16
17
18
19
20
21
Launching lib/main.dart on iPhone Xʀ in debug mode...
Running Xcode build...

Xcode build done. 3.3s
Failed to build iOS app
Error output from Xcode build:

** BUILD FAILED **


Xcode's output:

=== BUILD TARGET firebase_analytics OF PROJECT Pods WITH CONFIGURATION Debug ===
/Users/l/Documents/flutter/.pub-cache/hosted/pub.dartlang.org/firebase_analytics-2.1.1+2/ios/Classes/FirebaseAnalyticsPlu
gin.m:60:7: error: use of undeclared identifier 'FIRAnalyticsConfiguration'
[[FIRAnalyticsConfiguration sharedInstance] setAnalyticsCollectionEnabled:[enabled boolValue]];
^
1 error generated.

Could not build the application for the simulator.
Error launching application on iPhone Xʀ.

解决方案:


将根目录下pubspec.yaml文件中 firebase_analytics: ^2.0.2+1 改为 firebase_analytics: ^3.0.1 之后运行flutter run


执行通过