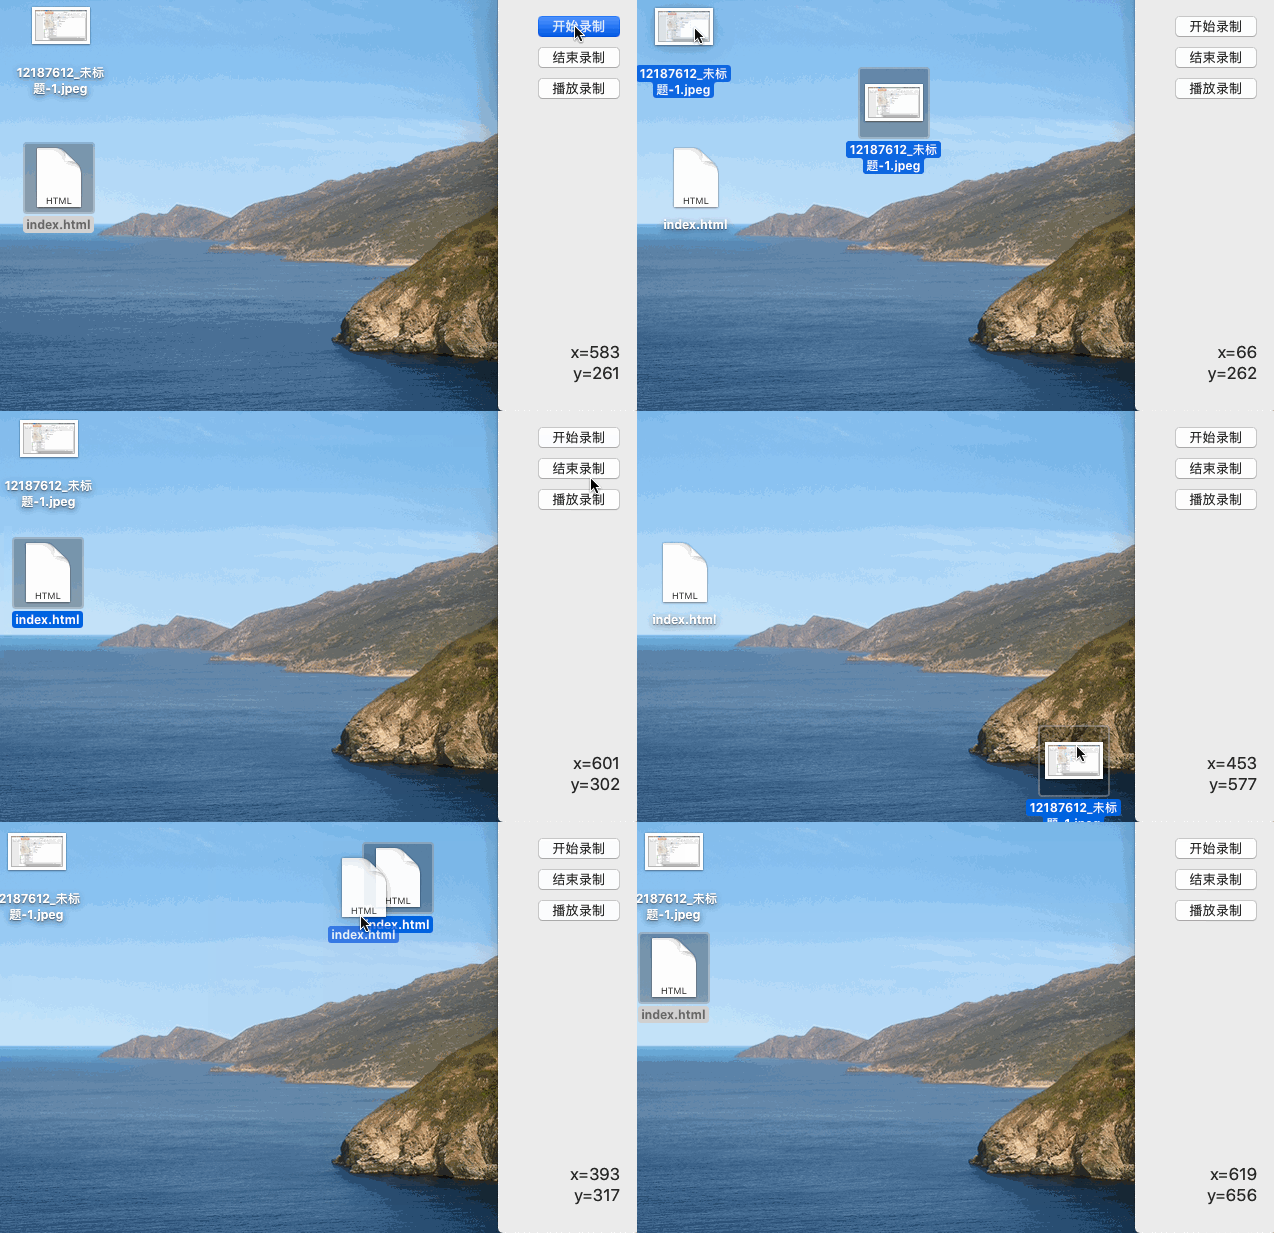
录制鼠标事件脚本

test007

用到自己封装好的工具 MAC代码模拟鼠标和键盘事件

var timeStamp:CLongLong = -1 //保存上次时间戳

var isStart:Bool = false //保存是否开始录制脚本

var events:[CGEvent] = CGEvent //保存所有鼠标事件

var times:[Int] = Int //保存鼠标事件事件间隔(完美时间还原脚本)

1.录制脚本
1
2
3
4
5
6
7
8
9
10
11
12
13
14
15
16
17
18
override func viewDidLoad() {
super.viewDidLoad()

monitor = NSEvent.addGlobalMonitorForEvents(matching:[.mouseMoved,.leftMouseDown,.leftMouseUp,.leftMouseDragged,.rightMouseDown,.rightMouseUp,.rightMouseDragged,.scrollWheel]) { [weak self](event) in
self?.label.cell?.title = "x=\(String(format: "%.0f", event.locationInWindow.x))\ny=\(String(format: "%.0f", ScreenHeight - event.locationInWindow.y))"
if(self!.isStart){//是否开始录制脚本
self!.events.append(event.cgEvent!)
if(self!.events.count > 1){
self!.times.append(Int(Date().milliStamp - self!.timeStamp))
self!.timeStamp = Date().milliStamp
}else{
self!.times.append(10)
self!.timeStamp = Date().milliStamp
}
}
}

}
2.播放脚本
1
2
3
4
5
6
7
8
9
10
11
12
func  playEvent(){
var index = 0
for event in events {
if(index > times.count - 1){
Thread.sleep(forTimeInterval: TimeInterval(0.01))
}else{
Thread.sleep(forTimeInterval: TimeInterval( Double(times[index]) / 1000.0))
}
index += 1;
event.post(tap: .cghidEventTap)
}
}
Flutter相关技术网站
iOS开发相关技术网站
技术社区网站
视频教程网站
开发辅助网站
App图标制作(图标制作)
图标工厂(图标制作)
TinyPNG(图片压缩)
Easy Mock(伪造数据)
Icons(Icons图标)
Iconfont(Icons图标)
常用在线工具网站
软件下载平台
正版中国(正版软件限时免费)
搜索工具
鸠摩搜索(文档搜索引擎)
茶杯狐(影视搜索引擎)
问答库(题库问答平台)
LibreStock(搜索免费图片及视频素材)

Git命令

安装Git就不在这里记录了,只记录使用。并且是在MAC环境下,Window环境可能会有少许的差异。

一 、初始化一个本地化仓库

  1. 首先选择一个要存储的目录,创建一个要管理的 GitStudy目录

    1
    mkdir GitStudy
  2. 进入到GitStudy目录

    1
    cd  GitStudy
  3. 使用git init初始化仓库,会在 GitStudy目录下创建一个 .git 的隐藏文件夹

    1
    git init

二、版本控制

  1. git add <file> 把改动或新建的文件添加到暂存区

    1
    git add readme.txt
  2. git commit -m <message> 确认把暂存区的文件提交到当前的分支

    1
    git commit -m "add readme.txt"

    提交后输出信息

    1
    2
    3
    [master (root-commit) 80af25d] add readme.txt
    1 file changed, 0 insertions(+), 0 deletions(-)
    create mode 100644 readme.txt
  1. 版本回退

    • git log 查看历史记录
    • git log –pretty=oneline (只会输出版本号和提交的message日志)
    1
    2
    3
    4
    5
    git reset #回退上一个版本

    git reset --hard HEAD^ #回退上一个版本

    git reset --hard <版本号> #回退到版本号对应的版本,回退之后,也可以通过这个命令返回回退之前的版本
    • 如果记不住版本号可以用 git reflog命令查看记录,最前面的字符串就是<版本号>

      1
      2
      143e5ea (HEAD -> master) HEAD@{0}: commit: add code1.txt
      80af25d HEAD@{1}: commit (initial): add readme.txt
  2. 丢弃工作区的修改:

    1
    2
    3
    4
    5
    git checkout -- readme.txt

    # 如果没有git add 加入缓存区,此文件所有更改被撤销
    # 如果已经被 git add 或者 git commit 回退没有效果
    # 如果 git add 或者 git commit 之后进行修改了,回退到 git add 或者 git commit 之后的状态

三、添加远程库

  1. 在本地的 GitStudy (根据实际情况,我上面创建的是GitStudy目录)目录下面运行命令:

    1
    git remote add origin https://gitee.com/用户名/GitStudy.git
  2. 把本地库推送到远程分支

    1
    git push -u origin master

四、从远程库克隆

1
git clone -b master https://gitee.com/用户名/GitStudy.git

五、创建与合并分支

  1. 创建dev分支,切换到dev

    1
    2
    3
    4
    5
    6
    7
    8
    git checkout -b dev

    #log
    #Switched to a new branch 'dev'

    # -b 表示创建并且进行切换,相当于执行了以下两个命令
    # git branch dev (创建dev分支)
    # git checkout dev (切换到 dev分支)

    或者 新版本加入了 switch 切换分支命令

    1
    2
    3
    git switch -c dev #创建并切换到新的dev分支

    git switch dev #直接切换到已有的dev分支
  1. 查看当前分支

    1
    2
    3
    4
    5
    6
    7
    git branch

    #log
    # *dev
    # master

    # 前面带*,表示当前所在的分支
  1. 合并分支,假设要把dev分支合并到master分支

    1
    2
    3
    4
    5
    6
    7
    #如果当前在dev分支,首先要切换到master分支,如果当前是在master分支,则不需要切换分支

    git checkout master #当前已经切换到master分支

    #执行合并命令

    git merge dev
  2. 删除分支

    1
    2
    3
    4
    5
    6
    7
    8
    9
    10
    11
    12
    # 如果上面dev分支不需要了,可以保留,也可以进行删除
    # ****删除的时候当前分支不要是处于被删除的分支***

    git branch -d dev

    # log
    # Deleted branch dev (was f23g67u).


    # 如果检出一个分支用来开发新分支,进行开发。
    # 在后来不进行合并,直接删除,会提示分支还没有被合并,如果删除,将丢失掉修改,如果要强行删除,需要使用大写的-D参数
    git branch -D test #强制删除 test 分支
  3. 解决冲突

    1
    2
    3
    4
    5
    #找到冲突文件,打开

    # Git用<<<<<<<,=======,>>>>>>>标记出不同分支的内容的冲突部分

    # 根据情况删除掉不要的, git add <filename> 暂存 ,commit提交
  4. Bug分支

    1
    2
    3
    4
    5
    6
    7
    8
    9
    10
    11
    12
    13
    14
    15
    16
    17
    18
    19
    20
    21
    22
    23
    #使用场景

    # 当前dev分支任务未完成,不能提交。而在另外一个test分支又需要进行修改。
    # 这个时候需要把现在的工作现场 存储 起来,等以后继续操作。
    git stash #暂存当前工作现场

    #这个时候就可以切换到其他分支,做其他工作了
    git checkout test

    #如果test分支工作完成了,并且已经提交。要切换回我们的dev分支,继续进行未完的工作。
    git checkout dev

    #接下来就要恢复现场,有两种方式

    # 查看
    git stash list #可以查看所有的已经存储的现场

    # 第一种方式
    git stash apply #恢复现场 但是stash存储的内容并不删除
    git stash drop #删除stash存储的数据

    # 第二种方式
    git stash pop #恢复现场,并且删除stash存储的数据

六、tag标签

  1. 创建tag标签

    1
    git tag v1.0
  2. 查看tag标签

    1
    2
    3
    4
    git tag

    #log
    # v1.0
  3. 操作标签

    1
    2
    3
    4
    5
    6
    7
    8
    9
    10
    11
    git tag -d v1.0 #删除标签(删除本地标签)

    git push origin v1.0 #推送tag标签到远程

    git push origin --tags #推送全部尚未推送到远程的本地标签

    #如果要删除推送到远程的tag标签需要两步:
    # 1.先删除本地的标签
    git tag -d v1.0
    # 2.删除远程的tag标签
    git push origin :refs/tags/v1.0

Bugly iOS SDK 使用指南

SDK 集成

Bugly提供两种集成方式供iOS开发者选择:

  • 通过CocoaPods集成
  • 手动集成

如果您是从Bugly 2.0以下版本升级过来的,请查看iOS SDK 升级指南

Bugly iOS SDK 最低兼容系统版本 iOS 7.0

通过CocoaPods集成

在工程的Podfile里面添加以下代码:

1
pod 'Bugly'

保存并执行pod install,然后用后缀为.xcworkspace的文件打开工程。

注意:

命令行下执行pod search Bugly,如显示的Bugly版本不是最新的,则先执行pod repo update操作更新本地repo的内容

关于CocoaPods的更多信息请查看 CocoaPods官方网站

手动集成

  • 下载 Bugly iOS SDK
  • 拖拽Bugly.framework文件到Xcode工程内(请勾选Copy items if needed选项)
  • 添加依赖库
    • SystemConfiguration.framework
    • Security.framework
    • libz.dyliblibz.tbd
    • libc++.dyliblibc++.tbd

初始化SDK

导入头文件

在工程的AppDelegate.m文件导入头文件

1
#import <Bugly/Bugly.h>

如果是Swift工程,请在对应bridging-header.h中导入

初始化Bugly

在工程AppDelegate.mapplication:didFinishLaunchingWithOptions:方法中初始化:

  • Objective-C
1
2
3
4
- (BOOL)application:(UIApplication *)application didFinishLaunchingWithOptions:(NSDictionary *)launchOptions {
[Bugly startWithAppId:@"此处替换为你的AppId"];
return YES;
}
  • Swift
1
2
3
4
func application(application: UIApplication, didFinishLaunchingWithOptions launchOptions: [NSObject: AnyObject]?) -> Bool {
Bugly.startWithAppId("此处替换为你的AppId")
return true
}

Bugly iOS 符号表配置(可选)

介绍

什么是符号表?

符号表是内存地址与函数名、文件名、行号的映射表。符号表元素如下所示:

1
<起始地址> <结束地址> <函数> [<文件名:行号>]

为什么要配置符号表?

为了能快速并准确地定位用户APP发生Crash的代码位置,Bugly使用符号表对APP发生Crash的程序堆栈进行解析还原

举一个例子:

Alt text

Bugly提供了自动和手动两种方法配置iOS符号表。

自动配置:XCode + sh脚本

自动配置请首先下载和解压自动配置符号表工具包,然后选择上传方式并配置Xcode的编译执行脚本。

上传方式

使用脚本自动配置支持两种上传方式:

  • 方式一:直接上传dSYM文件(默认方式 )
  • 方式二:提取dSYM文件的符号表文件并上传

其中,使用方式二需要额外操作以下几步:

  • 下载符号表提取工具依赖的Java运行环境(JRE或JDK版本需要>=1.6)
  • 把工具包buglySymbolIOS.jar保存在用户主目录(Home)的bin目录下(没有bin文件夹,请自行创建):

Alt text

配置Xcode编译执行脚本

  • 在Xcode工程对应Target的Build Phases中新增Run Scrpit Phase

Alt text

Alt text

  • 打开工具包中的dSYM_upload.sh,复制所有内容,在新增的Run Scrpit Phase中粘贴
  • 修改新增的Run Scrpit中的 <YOUR_APP_ID> 为您的App ID,<YOUR_APP_KEY>为您的App Key,<YOUR_BUNDLE_ID> 为App的Bundle Id

Alt text

脚本默认在Debug模式及模拟器编译情况下不会上传符号表,在需要上传的时候,请修改下列选项

  • Debug模式编译是否上传,1=上传 0=不上传,默认不上传

    UPLOAD_DEBUG_SYMBOLS=0

  • 模拟器编译是否上传,1=上传 0=不上传,默认不上传

    UPLOAD_SIMULATOR_SYMBOLS=0

至此,自动上传符号表脚本配置完毕,Bugly 会在每次 Xcode 工程编译后自动完成符号表配置工作。

手动配置

手动配置的流程如下:

  • 下载最新版Bugly iOS符号表工具,其中工具包中包括:
    • 符号表工具JAR包(buglySymboliOS.jar)
    • Windows的脚本(buglySymboliOS.bat)
    • Shell脚本(buglySymboliOS.sh)
    • 默认符号表配置文件(settings.txt)
    • 符号表工具iOS版-使用指南
  • 根据Crash的UUID定位dSYM文件
  • 使用工具生成符号表文件(zip文件)
  • 在页面上传符号表文件

Alt text

其他说明

  • Bugly iOS符号表工具2.3.0及以上版本增加了上传功能,2.5.0及以上版本支持dSYM文件的上传;
  • 定位dSYM文件的方法和工具的使用方法请参考:“符号表工具iOS版-使用指南”。

符号表上传接口

Bugly提供了上传符号表的API接口(使用POST方式上传):

HTTPS接口支持上传dSYM文件(需要压缩成Zip文件)和符号表文件(Symbol)。

参数说明

上传接口的参数说明如下:

属性 说明
api_version API版本,固定为1
app_id App ID
app_key App Key
symbolType 符号表类型,iOS为2
bundleId 包名(Package)
productVersion 版本号(Version Name)
fileName 符号表文件名
file 符号表文件

其中包名、版本号和符号表文件名需要做URL Encode。

例子:使用Curl上传

使用Curl工具来上传的例子如下:

  • 上传dSYM文件
1
curl -k "https://api.bugly.qq.com/openapi/file/upload/symbol?app_key=xxxxxx&app_id=xxxxxx" --form "api_version=1" --form "app_id=xxxxxx" --form "app_key=xxxxxx" --form "symbolType=2"  --form "bundleId=com.demo.test" --form "productVersion=1.0" --form "channel=xxx" --form "fileName=app.dSYM.zip" --form "file=@app.dSYM.zip" --verbose
  • 上传符号表文件(Symbol文件)
1
curl -k "https://api.bugly.qq.com/openapi/file/upload/symbol?app_key=xxxxxx&app_id=xxxxxx" --form "api_version=1" --form "app_id=xxxxxx" --form "app_key=xxxxxx" --form "symbolType=2"  --form "bundleId=com.demo.test" --form "productVersion=1.0" --form "fileName=symbol.zip" --form "file=@symbol.zip" --verbose

dSYM文件

什么是dSYM文件?

iOS平台中,dSYM文件是指具有调试信息的目标文件,文件名通常为:xxx.app.dSYM。如下图所示:

Alt text

1
为了方便找回Crash对应的dSYM文件和还原堆栈,建议每次构建或者发布APP版本的时候,备份好dSYM文件。

如何定位dSYM文件?

一般情况下,项目编译完dSYM文件跟app文件在同一个目录下,下面以XCode作为IDE详细说明定位dSYM文件。

1
2
3
4
5
-> 进入XCode;
-> 打开工程(已编译过);
-> 在左栏找到“Product”项;
-> 鼠标右键点击编译生成的“xxx.app”;
-> 点击“Show in Finder”;

如下图所示:

Alt text

Alt text

如果有多个dSYM文件,可以在使用工具时指定输入为dSYM文件所在的目录或者工程目录。

XCode编译后没有生成dSYM文件?

XCode Release编译默认会生成dSYM文件,而Debug编译默认不会生成,对应的Xcode配置如下:

1
2
XCode -> Build Settings -> Code Generation -> Generate Debug Symbols -> Yes
XCode -> Build Settings -> Build Option -> Debug Information Format -> DWARF with dSYM File

Alt text

开启Bitcode之后需要注意哪些问题?

  • 在点“Upload to App Store”上传到App Store服务器的时候需要声明符号文件(dSYM文件)的生成:

Alt text

  • 在配置符号表文件之前,需要从App Store中把该版本对应的dSYM文件下载回本地(参考“如何找回已发布到App Store的App对应的dSYM文件?”),然后用符号表工具生成和上传符号表文件。
  • 不需要配置自动生成符号表的脚本了,也不要用本地生成的dSYM文件来生成符号表文件,因为本地编译生成的dSYM文件的符号表信息都被隐藏了。如果用本地编译生成的dSYM文件生成符号表文件并配置到Bugly平台之后,还原出来的结果将是类似于“__hiden#XXX”这样的符号。

如何判断dSYM文件是否与Crash的UUID匹配?

Bugly还原Crash堆栈时,需要根据UUID来匹配符号表文件,因此只有上传的符号表文件的UUID与Crash对应APP的UUID一致时,才能准确地对堆栈进行还原。

Bugly v1.0页面

1
崩溃 ---> Crash issue ---> dSYM UUID

Alt text

Bugly v2.0页面

1
崩溃分析 ---> Crash issue ---> 符号表 ---> UUID

Alt text

如何查看dSYM文件的UUID?

通过命令查看UUID

1
xcrun dwarfdump --uuid <dSYM文件>

通过符号表文件查看UUID

符号表文件的UUID与dSYM文件的UUID是一致的,因此可以通过符号表工具生成的符号表文件来查看dSYM文件的UUID:

1
生成符号表文件(.zip) ---> 解压符号表文件(.symbol) ---> 使用文本编辑器打开符号表文件

Alt text

其中符号表文件的“UUID”信息即Debug SO文件的UUID,亦是符号表文件的UUID,如果文件较大,建议使用“Sublime Text”等文本编辑器来打开符号表文件。

如何找回已发布到App Store的App对应的dSYM文件?

通过Xcode找回

  1. 打开 Xcode 顶部菜单栏 -> Window -> Organizer 窗口: Alt text
  2. 打开 Xcode 顶部菜单栏,选择 Archive 标签: Alt text
  3. 找到发布的归档包,右键点击对应归档包,选择Show in Finder操作: Alt text
  4. 右键选择定位到的归档文件,选择显示包内容操作: Alt text
  5. 选择dSYMs目录,目录内即为下载到的 dSYM 文件: Alt text

通过iTunes Connect找回

  1. 登录iTunes Connect
  2. 进入“我的App(My Apps)”的“活动(Activity)”页面: Alt text
  3. 在“所有构件版本(All Builds)”中选择某一个版本,点“下载dSYM(Download dSYM)”下载dSYM文件: Alt text

通过mdfind工具找回

在Bugly的issue页面查询到crash对应的UUID:

然后在Mac的Shell中,用mdfind命令定位dSYM文件:

1
mdfind "com_apple_xcode_dsym_uuids == <UUID>"

注意,使用mdfind时,UUID需要格式转换(增加“-”): 12345678-1234-1234-1234-xxxxxxxxxxxx

例如,要定位的dSYM的UUID为:E30FC309DF7B3C9F8AC57F0F6047D65F 则定位dSYM文件的命令如下:

1
2
mdfind "com_apple_xcode_dsym_uuids == E30FC309-DF7B-3C9F-8AC5-7F0F6047D65F"
|12345678-1234-1234-1234-xxxxxxxxxxxx|

建议每次构建或者发布APP版本的时候,备份App对应的dSYM文件!

开启debug模式符号表上传功能(主要用于测试集成问题,可不需要)

XCode编译后生成dSYM文件设置

XCode Release编译默认会生成dSYM文件,而Debug编译默认不会生成,对应的Xcode配置如下:

  • XCode -> Build Settings -> Code Generation -> Generate Debug Symbols -> Yes

  • XCode -> Build Settings -> Build Option -> Debug Information Format -> DWARF with dSYM File

  • 脚本中 UPLOAD_DEBUG_SYMBOLS的值改为1

不需要debug模式上传的话,只需要还原到之前的设置就行了

官方文档地址 :Bugly iOS SDK 使用指南 Bugly iOS 符号表配置

通过bug报错的堆栈信息 和 符号表结合解析后能够快速的定位到类、方法甚至行号

bugly

swift 获取当前顶层控制器

1
2
3
4
5
6
7
8
9
10
11
12
13
14
15
16
17
18
19
var topViewController: UIViewController? {
var resultVC: UIViewController?
resultVC = _topViewController(UIApplication.shared.keyWindow?.rootViewController)
while resultVC?.presentedViewController {
resultVC = _topViewController(resultVC?.presentedViewController)
}
return resultVC
}

func _topViewController(_ vc: UIViewController?) -> UIViewController? {
if (vc is UINavigationController) {
return _topViewController((vc as? UINavigationController)?.topViewController)
} else if (vc is UITabBarController) {
return _topViewController((vc as? UITabBarController)?.selectedViewController)
} else {
return vc
}
return nil
}

Swift全局状态监听小技巧(willSet,didSet)

封装:便于统一管理,方便使用
1
2
3
4
5
6
7
8
9
10
11
12
13
14
15
16
17
18
19
20
21
22
23
24
25
26
27
28
29
30
31
32
33
34
enum FyAppObserverName:String{
case isLogin = "isLogin" //是否是登录状态
case isVip = "isVip" //是否是Vip
case timeLength = "timeLength" //时长
}

class FyAppStatusManger:NSObject{
static let shared = FyAppStatusManger.init()
var valueChanged:((_ observerName:FyAppObserverName,_ oldValue:Any?,_ newValue:Any?) ->())?

override init(){
super.init()
}

//需要监听变化的值
var isLogin:Bool = false{
didSet{
valueChanged?(.isLogin, oldValue, isLogin)
}
}

var isVip:Bool = false{
didSet{
valueChanged?(.isVip, oldValue, isLogin)
}
}

var timeLength:Int = 0{
didSet{
valueChanged?(.timeLength, oldValue, isLogin)
}
}

}
使用:
1
2
3
4
5
6
7
8
9
10
11
12
13
FyAppStatusManger.shared.valueChanged =  {(observerName,oldValue ,newValue) in
//可以在app需要的地方调用,需求监听的状态可以根据实际情况自由搭配
switch observerName{
case .isLogin:
//登录状态发生改变
break
case .isVip:
//会员状态发生改变
break
default:
break
}
}

Mac下移动硬盘无法读取(以前是可以读取的)

不进行处理的话,一般连接移动硬盘半个小时左右就会显示了;不想等待的话就执行以下命令,强制加载

可以在终端中执行以下命令:diskutil list ,控制台输出信息如下:

1
2
3
4
5
6
7
8
9
10
11
12
13
14
15
16
17
18
19
20
21
22
@ls--MacBook-Air  ~ $ diskutil list
/dev/disk0 (internal, physical):
#: TYPE NAME SIZE IDENTIFIER
0: GUID_partition_scheme *121.3 GB disk0
1: EFI EFI 209.7 MB disk0s1
2: Apple_APFS Container disk1 121.1 GB disk0s2

/dev/disk1 (synthesized):
#: TYPE NAME SIZE IDENTIFIER
0: APFS Container Scheme - +121.1 GB disk1
Physical Store disk0s2
1: APFS Volume Macintosh HD - 数据 95.8 GB disk1s1
2: APFS Volume Preboot 82.4 MB disk1s2
3: APFS Volume Recovery 528.5 MB disk1s3
4: APFS Volume VM 3.2 GB disk1s4
5: APFS Volume Macintosh HD 10.9 GB disk1s5

/dev/disk2 (external, physical):
#: TYPE NAME SIZE IDENTIFIER
0: GUID_partition_scheme *1.0 TB disk2
1: EFI EFI 209.7 MB disk2s1
2: Microsoft Basic Data LPF 1000.0 GB disk2s2

通过以上输出信息,可以找到移动硬盘挂载路径:/dev/disk2 ,根据输出显示实际挂载路径填写。

执行命令:sudo diskutil mount /dev/disk2 ,控制台输出信息如下:

1
2
@ls-MacBook-Air  ~ $ sudo diskutil mountDisk /dev/disk2
Volume(s) mounted successfully

输出以上信息表示移动硬盘挂载成功了,如果输出以下信息:

1
2
3
4
5
6
 @ls-MacBook-Air  ~ $ sudo diskutil mount /dev/disk2
Password:
Volume on disk2 failed to mount
Perhaps the operation is not supported (kDAReturnUnsupported)
If it has a partitioning scheme, use "diskutil mountDisk"
If you think the volume is supported but damaged, try the "readOnly" option

输出以上信息表示不支持 sudo diskutil mount /dev/disk2 这种装载方式,使用以下方式进行装载

执行命令: sudo diskutil mountDisk /dev/disk2 , 而不是 sudo diskutil mount /dev/disk2

1
2
@ls-MacBook-Air  ~ $ sudo diskutil mountDisk /dev/disk2
Volume(s) mounted successfully

以上命令方法不行的话,那就电脑连接移动硬盘老老实实等大概半个小时就好了

1
2
3
4
5
6
7
8
9
10
11
12
13
14
15
16
17
18
19
20
21
22
23
24
25
26
27
28
29
30
31
32
33
34
35
36
37
38
39
40
41
42
43
44
45
46
47
48
49
50
51
52
53
54
55
56
57
58
59
60
61
62
63
64
65
66
{".3gp",    "video/3gpp"},   
{".apk", "application/vnd.android.package-archive"},
{".asf", "video/x-ms-asf"},
{".avi", "video/x-msvideo"},
{".bin", "application/octet-stream"},
{".bmp", "image/bmp"},
{".c", "text/plain"},
{".class", "application/octet-stream"},
{".conf", "text/plain"},
{".cpp", "text/plain"},
{".doc", "application/msword"},
{".docx", "application/vnd.openxmlformats-officedocument.wordprocessingml.document"},
{".xls", "application/vnd.ms-excel"},
{".xlsx", "application/vnd.openxmlformats-officedocument.spreadsheetml.sheet"},
{".exe", "application/octet-stream"},
{".gif", "image/gif"},
{".gtar", "application/x-gtar"},
{".gz", "application/x-gzip"},
{".h", "text/plain"},
{".htm", "text/html"},
{".html", "text/html"},
{".jar", "application/java-archive"},
{".java", "text/plain"},
{".jpeg", "image/jpeg"},
{".jpg", "image/jpeg"},
{".js", "application/x-javascript"},
{".log", "text/plain"},
{".m3u", "audio/x-mpegurl"},
{".m4a", "audio/mp4a-latm"},
{".m4b", "audio/mp4a-latm"},
{".m4p", "audio/mp4a-latm"},
{".m4u", "video/vnd.mpegurl"},
{".m4v", "video/x-m4v"},
{".mov", "video/quicktime"},
{".mp2", "audio/x-mpeg"},
{".mp3", "audio/x-mpeg"},
{".mp4", "video/mp4"},
{".mpc", "application/vnd.mpohun.certificate"},
{".mpe", "video/mpeg"},
{".mpeg", "video/mpeg"},
{".mpg", "video/mpeg"},
{".mpg4", "video/mp4"},
{".mpga", "audio/mpeg"},
{".msg", "application/vnd.ms-outlook"},
{".ogg", "audio/ogg"},
{".pdf", "application/pdf"},
{".png", "image/png"},
{".pps", "application/vnd.ms-powerpoint"},
{".ppt", "application/vnd.ms-powerpoint"},
{".pptx", "application/vnd.openxmlformats-officedocument.presentationml.presentation"},
{".prop", "text/plain"},
{".rc", "text/plain"},
{".rmvb", "audio/x-pn-realaudio"},
{".rtf", "application/rtf"},
{".sh", "text/plain"},
{".tar", "application/x-tar"},
{".tgz", "application/x-compressed"},
{".txt", "text/plain"},
{".wav", "audio/x-wav"},
{".wma", "audio/x-ms-wma"},
{".wmv", "audio/x-ms-wmv"},
{".wps", "application/vnd.ms-works"},
{".xml", "text/plain"},
{".z", "application/x-compress"},
{".zip", "application/x-zip-compressed"},
{"", "*/*"}

官方指定的文件类型 Document Content Type UTIs

官方指定的文件类型

1
2
3
4
5
6
7
8
9
10
11
12
13
14
15
16
17
18
19
20
21
22
23
24
25
26
27
<array>
<dict>
<key>CFBundleTypeRole</key>
<string>Viewer</string>
<key>LSHandlerRank</key>
<string>Owner</string>
<key>CFBundleTypeIconFiles</key>
<array/>
<key>CFBundleTypeName</key>
<string>文件共享</string>
<key>LSItemContentTypes</key>
<array>
<string>public.data</string>
<string>com.microsoft.excel.xls</string>
<string>public.text</string>
<string>public.plain-text </string>
<string>public.image</string>
<string>public.jpeg</string>
<string>public.png</string>
<string>com.microsoft.bmp </string>
<string>com.compuserve.gif </string>
<string>com.adobe.pdf</string>
<string>com.microsoft.powerpoint.ppt</string>
<string>com.microsoft.word.doc</string>
</array>
</dict>
</array>

Vue脚手架

1
2
3
4
5
6
7
8
9
10
11
12
13
14
15
16
17
18
19
20
21
22
23
24
25
26
27
28
29
30
31
32
33
34
35
36
37
38
39
40
41
42
43
44
45
46
47
48
49
50
51
52
53
54
55
56
57
58
59
60
61
62
63
64
65
66
67
68
69
70
71
72
73
74
75
76
77
78
79
80
81
82
83
84
85
86
87
88
89
90
91
92
93
94
95
96
97
98
99
100
101
102
103
104
105
106
107
108
109
110
111
112
113
114
115
116
117
118
119
120
121
122
123
124
125
126
127
128
129
130
131
132
133
134
135
Last login: Fri Apr 24 09:31:11 on console
l@ls-MacBook-Air  ~  npm -v
6.14.4
l@ls-MacBook-Air  ~  webpack -v
3.6.0
l@ls-MacBook-Air  ~  npm install -g @vue/cli
npm WARN deprecated request@2.88.2: request has been deprecated, see https://github.com/request/request/issues/3142
npm WARN deprecated fsevents@1.2.12: fsevents 1 will break on node v14+. Upgrade to fsevents 2 with massive improvements.
/usr/local/bin/vue -> /usr/local/lib/node_modules/@vue/cli/bin/vue.js

> fsevents@1.2.12 install /usr/local/lib/node_modules/@vue/cli/node_modules/fsevents
> node-gyp rebuild

SOLINK_MODULE(target) Release/.node
CXX(target) Release/obj.target/fse/fsevents.o
SOLINK_MODULE(target) Release/fse.node

> core-js@3.6.5 postinstall /usr/local/lib/node_modules/@vue/cli/node_modules/core-js
> node -e "try{require('./postinstall')}catch(e){}"

Thank you for using core-js ( https://github.com/zloirock/core-js ) for polyfilling JavaScript standard library!

The project needs your help! Please consider supporting of core-js on Open Collective or Patreon:
> https://opencollective.com/core-js
> https://www.patreon.com/zloirock

Also, the author of core-js ( https://github.com/zloirock ) is looking for a good job -)

+ @vue/cli@4.3.1
added 100 packages from 50 contributors, removed 18 packages, updated 228 packages and moved 7 packages in 102.781s
l@ls-MacBook-Air  ~  vue --version
@vue/cli 4.3.1
l@ls-MacBook-Air  ~  npm install -g @vue/cli-init
npm WARN deprecated vue-cli@2.9.6: This package has been deprecated in favour of @vue/cli
npm WARN deprecated request@2.88.2: request has been deprecated, see https://github.com/request/request/issues/3142
npm WARN deprecated coffee-script@1.12.7: CoffeeScript on NPM has moved to "coffeescript" (no hyphen)
+ @vue/cli-init@4.3.1
added 254 packages from 207 contributors in 19.423s
l@ls-MacBook-Air  ~  cd /Users/l/Desktop/VueTemp/vueDemo
l@ls-MacBook-Air  ~/Desktop/VueTemp/vueDemo  vue init webpack vuedemo001

? Project name vuedemo001
? Project description test vue demo 001
? Author ifeiyv 719507339@qq.com
? Vue build standalone
? Install vue-router? No
? Use ESLint to lint your code? No
? Set up unit tests No
? Setup e2e tests with Nightwatch? No
? Should we run `npm install` for you after the project has been created? (recommended) npm

vue-cli · Generated "vuedemo001".


# Installing project dependencies ...
# ========================

npm WARN deprecated extract-text-webpack-plugin@3.0.2: Deprecated. Please use https://github.com/webpack-contrib/mini-css-extract-plugin
npm WARN deprecated browserslist@2.11.3: Browserslist 2 could fail on reading Browserslist >3.0 config used in other tools.
npm WARN deprecated bfj-node4@5.3.1: Switch to the `bfj` package for fixes and new features!
npm WARN deprecated core-js@2.6.11: core-js@<3 is no longer maintained and not recommended for usage due to the number of issues. Please, upgrade your dependencies to the actual version of core-js@3.
npm WARN deprecated fsevents@1.2.12: fsevents 1 will break on node v14+. Upgrade to fsevents 2 with massive improvements.
npm WARN deprecated browserslist@1.7.7: Browserslist 2 could fail on reading Browserslist >3.0 config used in other tools.

> fsevents@1.2.12 install /Users/l/Desktop/VueTemp/vueDemo/vuedemo001/node_modules/fsevents
> node-gyp rebuild

SOLINK_MODULE(target) Release/.node
CXX(target) Release/obj.target/fse/fsevents.o
SOLINK_MODULE(target) Release/fse.node

> core-js@2.6.11 postinstall /Users/l/Desktop/VueTemp/vueDemo/vuedemo001/node_modules/core-js
> node -e "try{require('./postinstall')}catch(e){}"

Thank you for using core-js ( https://github.com/zloirock/core-js ) for polyfilling JavaScript standard library!

The project needs your help! Please consider supporting of core-js on Open Collective or Patreon:
> https://opencollective.com/core-js
> https://www.patreon.com/zloirock

Also, the author of core-js ( https://github.com/zloirock ) is looking for a good job -)


> ejs@2.7.4 postinstall /Users/l/Desktop/VueTemp/vueDemo/vuedemo001/node_modules/ejs
> node ./postinstall.js

Thank you for installing EJS: built with the Jake JavaScript build tool (https://jakejs.com/)


> uglifyjs-webpack-plugin@0.4.6 postinstall /Users/l/Desktop/VueTemp/vueDemo/vuedemo001/node_modules/webpack/node_modules/uglifyjs-webpack-plugin
> node lib/post_install.js

npm notice created a lockfile as package-lock.json. You should commit this file.
npm WARN ajv-keywords@3.4.1 requires a peer of ajv@^6.9.1 but none is installed. You must install peer dependencies yourself.

added 1304 packages from 688 contributors and audited 12074 packages in 73.643s

27 packages are looking for funding
run `npm fund` for details

found 13 vulnerabilities (1 low, 8 moderate, 4 high)
run `npm audit fix` to fix them, or `npm audit` for details

# Project initialization finished!
# ========================

To get started:

cd vuedemo001
npm run dev

Documentation can be found at https://vuejs-templates.github.io/webpack


l@ls-MacBook-Air  ~/Desktop/VueTemp/vueDemo  cd vuedemo001
l@ls-MacBook-Air  ~/Desktop/VueTemp/vueDemo/vuedemo001  npm run dev

> vuedemo001@1.0.0 dev /Users/l/Desktop/VueTemp/vueDemo/vuedemo001
> webpack-dev-server --inline --progress --config build/webpack.dev.conf.js

12% building modules 21/29 modules 8 active ...ueTemp/vueDemo/vuedemo001/src/App.vue{ parser: "babylon" } is deprecated; we now treat it as { parser: "babel" }.
95% emitting

DONE Compiled successfully in 8110ms 3:26:40 PM

I Your application is running here: http://localhost:8080


WAIT Compiling... 3:27:53 PM

95% emitting

DONE Compiled successfully in 1213ms 3:27:55 PM

I Your application is running here: http://localhost:8080

1
2
3
4
5
6
7
8
9
10
11
12
13
14
15
16
17
18
19
20
21
22
23
24
25
#https://github.com/flutterchina/dio/blob/master/README-ZH.md

dio: ^3.0.9 #网络请求框架

cookie_jar: ^1.0.1

dio_cookie_manager: ^1.0.0

path_provider: ^1.6.7

event_bus: ^1.1.1

#https://pub.flutter-io.cn/packages/connectivity

connectivity: ^0.4.8+2 #链接网络状态监测

fluttertoast: ^4.0.1

shared_preferences: ^0.5.6+3

pull_to_refresh: ^1.5.7

modal_progress_hud: ^0.1.3

webview_flutter: ^0.3.20+2

1. 封装Text,只向外提供常用的属性,根据需求适当需改

1
2
3
4
5
6
7
8
9
10
11
12
13
14
15
16
static Widget text(String data, {
double textScaleFactor = 1.0,
Color color = Colors.black,
double fontSize = 16,
FontWeight fontWeight = FontWeight.normal,
FontStyle fontStyle = FontStyle.normal
}){
return Text(data,
textScaleFactor: textScaleFactor,
style: TextStyle(
color: color,
fontSize: fontSize,
fontWeight: fontWeight,
fontStyle: fontStyle,
),);
}

2. 检测当前主题

1
2
3
4
static bool isDark(BuildContext context){
final Brightness brightnessValue = Theme.of(context).brightness;
return brightnessValue == Brightness.dark;
}

3. 根据主题设置颜色

1
2
3
4
5
6
7
8
9
10
11
//是否是深色模式 true dark主题模式  false light主题模式
static bool isDark(context){
return Theme.of(context).brightness == Brightness.dark;
}
static Color dyColor(BuildContext context,darkColor,lightColor) => isDark(context) ? darkColor : lightColor;
//背景颜色
static Color dyBgColor(BuildContext context) => isDark(context) ? MColor.darkBgColor : Colors.white;
//字体颜色
static Color dyFontColor(BuildContext context) => isDark(context) ? MColor.textColor : MColor.black;
static Color dyRedColor(BuildContext context) => isDark(context) ? Colors.red[400] : Colors.red;
static Color dyBlueColor(BuildContext context) => isDark(context) ? Colors.blue[600] : Colors.blue;

4. 返回一个字体不跟随系统缩放的Widget

1
2
3
4
5
6
7
static noScaleWidget(Widget widget){
return MediaQuery(
data: MediaQueryData
.fromWindow(WidgetsBinding.instance.window)
.copyWith(textScaleFactor: 1),
child: widget);
}

5. 取随机颜色(需要import 'dart:math';

1
2
3
4
5
6
7
static Color getRandomColor() {
var random = new Random();
int r = random.nextInt(255);
int g = random.nextInt(255);
int b = random.nextInt(255);
return Color.fromARGB(255, r, g, b);
}